 Discover the simple steps on how to remove mold from your home, ensuring a fresh and healthy environment. Dive in for practical and effective tips!
We’ve all been there – spotting that unwelcome greenish-black patch in our homes and wondering how to tackle it.
Well, you’re in luck! In this guide, we’ll walk you through the nitty-gritty of ‘how to remove mold’ and reclaim your cozy living space. So, grab your cleaning gloves, and let’s get started!
How To Remove Mold and Why
Removing mold is important because it ensures a healthy living environment. Mold can cause respiratory issues, allergic reactions, and compromise indoor air quality. Moreover, it can damage home structures, deteriorate furniture, and decrease property value. Thus, timely mold removal safeguards both health and property.
Ah, mold! That pesky, uninvited guest that just loves to make its home in our spaces.
But what really is mold, and why does it seem to pop up everywhere? In this section, we’re diving deep into the world of mold, its types, its favorite hideouts, and even some myths you might have heard.
So, come on in, and let’s demystify this common household intruder together!
Definition and types of mold
The big question: just what is mold, anyway? Well, mold is a type of fungus.
Imagine tiny little organisms too small to see with the naked eye, thriving in damp and warm conditions.
While there are thousands of mold species out there, a few common ones you might stumble upon in your home include Aspergillus, Cladosporium, and that notorious black mold, Stachybotrys chartarum.
Each has its quirks and characteristics, but what they all share is a love for moisture-rich environments.
Health and structural concerns of mold
Now, onto the part everyone’s curious (and perhaps a bit worried) about.
First and foremost, let’s chat health. Mold, especially when it’s growing unchecked, can be a sneaky health hazard.
Some folks might get a sniffle here and there, while others could experience more serious respiratory issues.
And if you’ve got allergies? Mold can become an unwanted enemy.
But that’s not all! On the structural side of things, mold is like that guest who overstays their welcome.
It can weaken your home’s framework, damage possessions, and give your walls and ceilings unsightly blemishes.
Safe to say, it’s more than just an eyesore.
How common is mold in buildings?
Molds are very common in buildings and homes. Mold will grow in places with a lot of moisture, such as around leaks in roofs, windows, or pipes, or where there has been flooding. Mold grows well on paper products, cardboard, ceiling tiles, and wood products. Mold can also grow in dust, paints, wallpaper, insulation, drywall, carpet, fabric, and upholstery. https://www.cdc.gov/mold/faqs.htm
What is Flood Remediation? 8 Important Steps
Ever faced the aftermath of a flood and thought, ‘Where do I even begin?’ You’re not alone.
Dealing with a flooded space feels overwhelming, to say the least. That’s where flood remediation steps in to save the day!
Think of it as your ultimate roadmap to bring your home back to its former glory.
In this section, we’re breaking down the 8 crucial steps of flood remediation. So, buckle up and let’s navigate these waters together!
The significance of flood remediation
You know, flood remediation is a bit like a hero arriving just in the nick of time in a movie.
When waters surge into your space, they don’t just bring in a wet mess. They also invite potential health hazards and structural damages.
Flood remediation isn’t just about drying out the place. It’s a systematic process that ensures your home’s safety, integrity, and well-being.
By restoring your living space to its pre-flood conditions, flood remediation helps you regain a sense of normalcy, putting the chaos behind you.
Role of flood remediation in mold prevention
Now, here’s where the plot thickens. Ever wondered how some homes bounce back after floods while others become moldy nightmares?
The answer often lies in effective flood remediation. Remember, mold is like that friend who never misses a party.
It thrives in damp environments. By swiftly and effectively drying and treating water-damaged areas, flood remediation acts as a barrier, stopping mold before it even gets its foot in the door.
So, while it might seem like an immediate solution to a water problem, flood remediation is also your first line of defense against future mold issues. How’s that for a two-in-one solution?
What are the 8 steps of flood remediation?
When discussing flood remediation, the specific steps can vary based on the severity of the flood, the type of property affected, and other circumstances.
However, here’s a general outline of the 8 important steps involved in the flood remediation process:
1. Safety First: Before starting any cleanup, ensure that it’s safe to enter the premises. This involves turning off electrical power, wearing protective gear, and checking the structural integrity of the building.
2. Assessment and Inspection: Professionals will assess the damage, categorize the water contamination level, and develop an action plan based on the severity of the flood impact.
3. Water Removal: Using specialized equipment like submersible pumps and wet vacuums, all standing water is removed from the property.
4. Drying and Dehumidification: Once the excess water is removed, drying out the affected areas is crucial. Dehumidifiers, fans, and other equipment help pull out the moisture from walls, carpets, and furniture.
5. Cleaning and Sanitizing: Floodwater often brings contaminants. Everything affected requires thorough cleaning and disinfection. Mold treatments might be applied to prevent mold growth.
6. Mold Prevention and Remediation: This step involves taking preventative measures to ensure mold doesn’t grow, and if it already has started growing, treating and removing it.
7. Restoration: This can range from minor repairs like replacing sections of drywall to major reconstructions of entire rooms.
8. Review and Future Prevention: After restoration, it’s good to review what caused the flood and how to prevent future issues.
This might include installing sump pumps, regrading the landscape, or addressing any structural issues that could lead to future flooding.
It’s always recommended to consult with professionals when dealing with flood remediation, as the process can be complex and requires expertise to ensure a thorough and safe recovery.
Bathroom Mold Removal: 3 Easy Tips to Prevent Mold
Okay, let’s talk bathrooms. These cozy corners of our homes, where we sing off-tune and come up with some of our best ideas, right?
But with all that warmth and moisture, they can also roll out the red carpet for mold.
Not exactly the kind of guest we want during our shower concerts.
But, good news! Keeping mold at bay is easier than you think.
In this section, we’re dishing out three easy-peasy tips for bathroom mold removal and prevention. Ready to keep your bathroom looking its best? Let’s dive in!
Common reasons for bathroom mold
Let’s kick things off with a little detective work. Before we tackle the mold, it helps to understand why it’s throwing a party in our bathrooms in the first place.
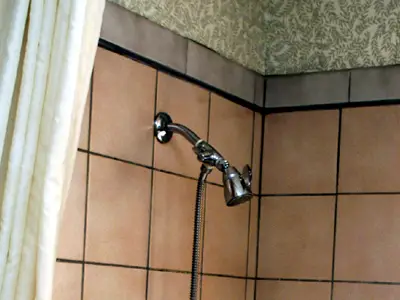
Constant Moisture: Bathrooms are like the rainforests of our homes. Showers, baths, and even the simple act of washing our hands can create a lot of moisture.
And where there’s consistent moisture, mold is never far behind.
1. Poor Ventilation: Ever noticed how mirrors fog up after a hot shower? That’s a sign of high humidity.
If there isn’t enough ventilation to let that humid air out, mold sees it as an open invitation.
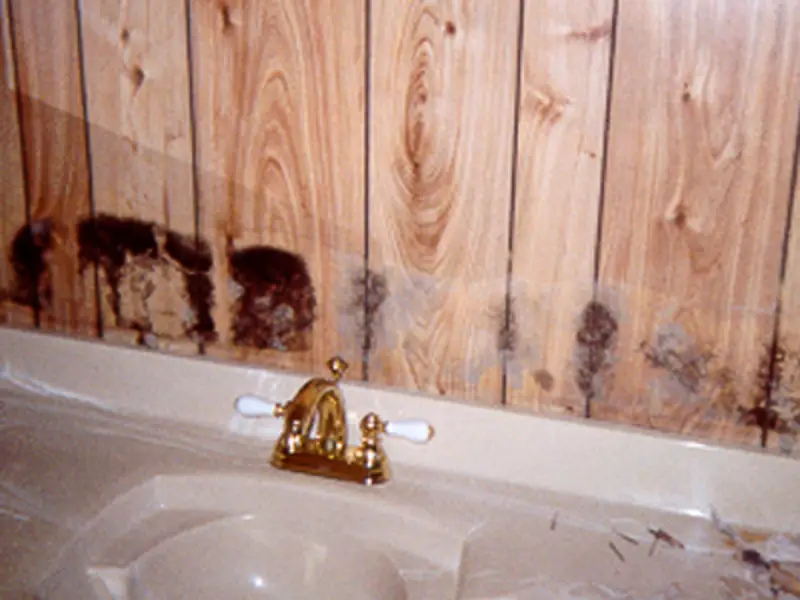
2. Leaky Fixtures: Is that a tiny drip from the faucet or the slightly leaky showerhead?
It might not seem like much, but over time, it creates an environment mold absolutely loves.
3. Infrequent Cleaning: Hey, we’ve all been there. Sometimes we let a week (or three) slip by without scrubbing the bathroom.
A build-up of soap scum, body oils, and organic material can become mold’s favorite snack.
Strategies for prevention
Alright, now that we’ve cracked the ‘whys’, let’s get down to the ‘hows’. Here’s how to keep mold from RSVPing to the bathroom party:
Ventilate, Ventilate, Ventilate: Think of this as giving your bathroom a breath of fresh air.
Every time you shower or bathe, turn on the exhaust fan or crack open a window. Letting out that humid air is half the battle won.
Regular Cleaning: Set a reminder, create a playlist, and do whatever you need to turn bathroom cleaning into a fun, regular habit.
Using mold-resistant cleaners and ensuring no standing water post-cleanup can be a game-changer.
Fix Leaks Promptly: Noticed a drip? Address it sooner rather than later.
Regularly check seals and grout too. Keeping things dry is like telling mold, Sorry, no room for you here!
Use Mold-Resistant Products: From shower curtains to paints, there’s a range of mold-resistant products available.
They might be a tad pricier but think of them as an investment in a mold-free future.
And there you have it! With a little awareness and some proactive steps, your bathroom can stay as fresh as those post-shower vibes.
11 Tips For Cleaning Up Mold After a Flood
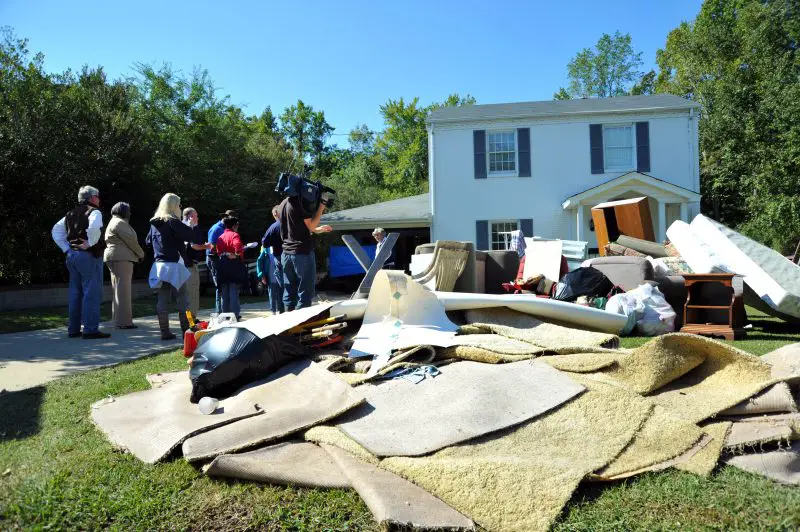
Picture this: The floodwaters have receded, leaving behind a soggy mess and memories of the unexpected deluge.
But wait, before you break out the victory dance, there’s a sneaky uninvited guest lurking around, mold.
Floods might come and go, but if left unchecked, mold can decide to set up shop.
In this section, we’re sharing 11 golden tips to help you clean up mold after a flood and ensure it thinks twice before making an encore. Let’s roll up those sleeves and get to it!
The aftermath of flooding: When does mold appear?
Alright, let’s set the scene. The floodwaters have come and gone, leaving you with damp floors, wet walls, and soggy furniture.
You might think, Okay, the worst is over! But here’s the twist: mold is a quick actor.
Within just 24 to 48 hours in the right conditions (read: damp and dark), those tiny spores can begin to colonize and spread.
And before you know it, they’ve thrown a full-blown mold party. The speedier you are in drying things out and cleaning up, the better your chances of keeping mold at bay.
Protective gear and equipment for mold cleanup
Before we dive into the cleaning, safety first! Think of mold cleanup as preparing for a mini adventure. You’ll need:
N95 Respirator: This isn’t your everyday face mask. It’s designed to protect you from breathing in those pesky mold spores.
Rubber Gloves: Opt for the long ones that extend to the middle of the forearm. This way, you’re covered, literally!
Safety Goggles: These should be without ventilation holes, so no mold spores sneak in.
Protective Clothing: Consider wearing a long-sleeved shirt and long pants that you’ll toss or thoroughly clean afterward.
And hey, if you want to rock a full-body suit, more power to you!
Sturdy Boots: You’re going to want boots that can be easily cleaned or coverings for your shoes that can be tossed.
11 Tips
Alright, now that we’re all suited up, let’s dive into those tips:
1. Quick Response: Time is of the essence! Start your cleanup as soon as it’s safe to do so.
2. Ventilate: Open windows and doors to let fresh air circulate and whisk away moisture.
3. Remove Water: Use pumps or vacuums to get rid of standing water. Remember, the faster you dry things out, the better!
4. Ditch Damaged Items: If something’s been soaked and can’t be cleaned or dried, it’s best to let it go.
5. Clean Hard Surfaces: Scrub them down with soap and water. Avoid bleach it doesn’t prevent the mold from returning and can pose its own health risks.
6. Dehumidify: Set up dehumidifiers in affected areas to suck out excess moisture.
7. Avoid Carpet: If carpets have been soaked and can’t be cleaned professionally, it’s better to toss them.
8. Check Insulation: Wet insulation is a mold magnet. Best to replace it.
9. Stay Vigilant: Over the next few days, keep an eye out for mold reappearing and signs of lingering moisture.
10. Seek Professional Help: If the mold area is extensive (larger than 10 square feet), consider bringing in the pros.
11. Educate & Prevent: Once it’s all cleaned up, take measures to prevent future mold growth. Knowledge is power!
And there you have it. With a dash of determination and these trusty tips in your toolkit, you’re on your way to a mold-free, post-flood haven.
How To Get Rid Of Black Mold In Your House Forever
Ah, black mold. The unwelcome house guest that never seems to get the hint.
It’s sneaky, persistent, and definitely not the kind of decor we’re going for.
But here’s the good news: even the most stubborn mold meets its match eventually.
In this section, we’re diving deep into the world of black mold, and more importantly, how to bid it a forever goodbye.
Ready to reclaim your space and give mold the boot? Let’s embark on this mold-busting journey together!
Recognizing black mold: Distinguishing features
Let’s play detective for a moment, shall we? If black mold were a character in a mystery novel, how would we describe it?
Color Spectrum: Now, the name ‘black mold’ might have given it away, but it’s not always jet black.
Sometimes, it’s more of a dark green or even a gray. Think of it as mold’s attempt at being fashionable.
Texture Tales: If you ever get up close and personal (though we recommend keeping your distance), black mold tends to be a bit slimy or even fuzzy.
Picture the texture of old, forgotten food in the back of the fridge. Yup, that’s the one!
Musty Odor: Got a smell in your home that’s reminiscent of old socks or wet newspapers? That’s our moldy culprit.
It has a distinct, musty scent that’s hard to ignore once you catch a whiff.
Location, Location, Location: Black mold loves damp, dark places. Check behind wallpapers, in the corners of your bathroom, or around leaking pipes.
If it’s hidden, it might just be black mold’s secret lair.
Proven methods for black mold elimination
Alright, now that we’ve identified the enemy, it’s time to gear up and get rid of it. Here’s our game plan:
Safety First: Before you tackle black mold, suit up! Wear gloves, goggles, and a face mask. Remember, you’re going into battle, and protection is key.
These can get rid of mold on hard surfaces but porous surfaces like drywall will need a different approach
Soap and Water: Sometimes, the simplest solutions are the best. Scrubbing the moldy area with good old soap and water can often do the trick for smaller infestations.
Vinegar Attack: Ah, the magic of vinegar. Fill a spray bottle with white distilled vinegar, spray it on the mold, let it sit for an hour, and then wipe away. The acidity doesn’t give mold a fighting chance.
Baking Soda: Think of baking soda as the friendly neighbor who helps out in a pinch. Mix it with water, spray it on the mold, scrub, rinse, and then spray again and let it dry. It cleans and deodorizes!
Hydrogen Peroxide: This isn’t just for cuts and scrapes. Fill a spray bottle with 3% hydrogen peroxide, spray it on the mold, let it sit for about 10 minutes, and then scrub the area.
Call in the Pros: If the mold area is large or if you’re unsure about DIY, don’t hesitate to call in professionals.
They have specialized equipment and know-how to ensure mold is gone and stays gone.
Remember, while these methods can help eliminate mold, prevention is always the best cure.
Keep those humidity levels in check, fix leaks promptly, and ensure good ventilation. Here’s to a mold-free, happy living space!
Why these wont work on porous surfaces and why moldy drywall should be removed
When we talk about mold, it’s essential to understand that mold isn’t just a surface-level issue, especially when it comes to porous materials. Here’s the scoop:
Porous Surfaces and Mold: The Tricky Relationship
Deep Dwellers: Porous materials, like wood, carpet, or drywall, aren’t just textured on the surface. How to remove mold from wood?
Use these 15 friendly tips and tricks to effectively remove mold from wood surfaces. rank_math_process_complete
How to remove mold from wood
Are you struggling with mold on your wooden surfaces? Don’t worry, we have you covered with these easy tips and tricks on how to effectively remove mold from wood.
Follow our step-by-step instructions and you’ll be able to tackle the issue head-on, restoring your wooden items to their former glory. Say goodbye to mold and hello to a clean and healthy environment!
They have tiny holes, or pores, that allow moisture and, subsequently, mold to penetrate deep within.
Think of them like a sponge, absorbing and trapping moisture and mold spores.
So, when you see mold on the surface, there’s a good chance there’s even more lurking within.
Clean-up Challenges: Given the sponge-like nature of porous materials, simply cleaning the surface doesn’t cut it.
While you might wipe away the visible mold, those deeply embedded spores remain, ready to resurface.
Mold’s Lifeline: Mold spores in the depths of porous materials have a protective environment, shielded from surface treatments.
They continue to thrive, feeding off the material and moisture, even if you’ve given the surface a thorough scrubbing or treated it with your go-to mold-removal solution.
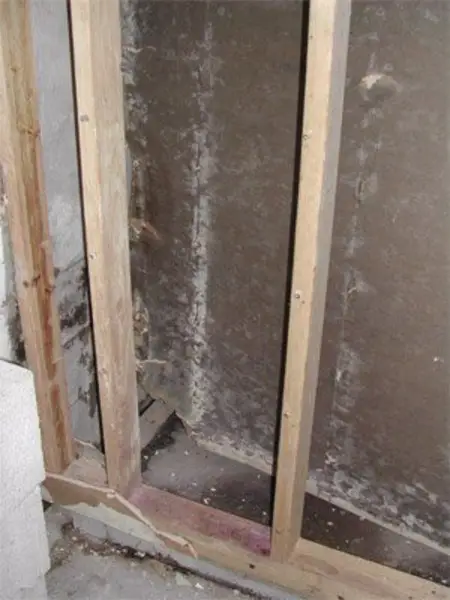
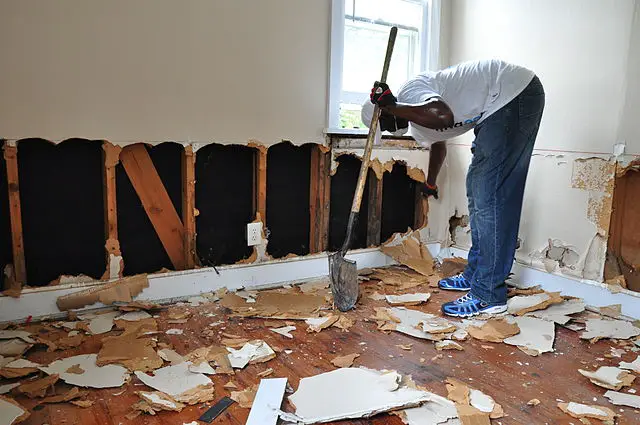
Why Moldy Drywall Needs the Boot
Irreversible Damage: Drywall, in particular, loses its structural integrity when wet.
Even if it dries, it’s often compromised, becoming a weaker version of its former self. Mold exacerbates this deterioration.
Mold Magnet: Drywall is a favorite for mold. Why? It’s often made with organic materials (hello, paper backing!), providing mold with a tasty food source.
Combine that with trapped moisture from a leak or high humidity, and you’ve got a mold fiesta.
Health Hazards: Moldy drywall isn’t just an eyesore; it can be a health concern.
Mold releases spores and mycotoxins, which can lead to allergic reactions and respiratory issues, especially for those with mold sensitivities.
Out of Sight, Out of Mind: Often, what you see on the surface of drywall is just the tip of the moldy iceberg.
Behind that wall, the situation could be far worse. Removing moldy drywall ensures you’re getting rid of the entire problem, not just addressing what’s in plain sight.
In summary, when it comes to mold and porous materials, it’s a deep-rooted relationship (pun intended).
Surface treatments often won’t cut it. And with something as crucial as the walls in your home, it’s better to be safe and remove moldy drywall than hope the issue magically disappears.
Getting Rid Of Mold In The House: 7 Tips and Tricks
Oh boy, mold in the house? Talk about an unwelcome roommate! But don’t fret; evicting this pesky intruder is entirely doable.
From the sneaky corners in your basement to that mysterious spot behind the fridge, we’ve got the ultimate guide lined up for you.
Packed with 7 stellar tips and tricks, we’ll help you turn your home into a no-mold zone.
Ready to roll up your sleeves and show mold the exit? Let’s dive in!
Identifying hidden spots for mold growth
Okay, first things first: Mold is a bit like that sneaky character in a hide-and-seek game who always seems to find the best hiding spots. So, before we kick it out, we’ve got to track it down.
Behind Wallpapers and Paint: You ever peel back old wallpaper and get an unexpected surprise? Mold just loves to hang out there, unnoticed until you decide on a decor change.
Underneath Carpets: Ah, the soft, cushy carpet might feel great underfoot, but lift it up and sometimes, you’ll find mold throwing a party beneath!
Ceiling Tiles: Especially in older buildings, these can be a mold hotspot. Particularly if there’s been a leak above them. Remember to give them a check, especially after rainy seasons.
HVAC Systems: Your heating, ventilation, and air conditioning systems create this lovely warm and moist environment.
Guess who adores it? Yep, mold.
Window Sills and Frames: With condensation and regular exposure to outside elements, these areas can be mold magnets. Those tiny black or green spots? Likely mold.
Chimneys: With all that trapped rainwater and organic matter, chimneys are like a five-star hotel for mold.
Closets: If you’ve got a closet against a cold outside wall, the lower temperature can cause moisture to condense, making it a prime spot for mold growth.
General mold removal techniques
Alrighty, now that we’ve had our hide-and-seek session with mold, let’s talk about sending it packing!
If mold is growing on hard surfaces you can use these to get rid of the mold:
Soap & Warm Water: Sometimes, you don’t need to get fancy. For non-porous surfaces, a scrub brush, some soap, and warm water can work wonders.
Vinegar: Mother Nature’s little cleaner. Spray undiluted vinegar on the moldy area, leave it for an hour, and then wipe it away. You might smell like a salad for a bit, but it’s worth it.
Baking Soda: Mix it with water to create a paste, apply it to the mold, give it a scrub, and rinse. Bonus: it also deodorizes!
Tea Tree Oil: A bit pricier, but a natural fungicide. A teaspoon of tea tree oil with a cup of water in a spray bottle can be a mold’s worst nightmare.
Hydrogen Peroxide: Spray it, let it sit for about ten minutes, then scrub. Not only does it remove mold, but it can also help prevent future growth.
Tips to Prevent Mold Growth
Keep Things Dry: This isn’t so much a removal technique as a preventative one.
Invest in a good dehumidifier and fix leaks ASAP to keep your home dry and mold at bay.
Call the Professionals: If things seem out of hand, or if the mold covers a large area, don’t hesitate to call in the experts.
They’ve got the tools, knowledge, and protective gear to handle bigger mold problems.
Remember, it’s all about being vigilant and taking action quickly.
The faster you can address mold growth, the easier (and cheaper!) it’ll be to get rid of it. Happy mold hunting!
How To Get Rid Of Black Mold In The Attic: 11 Tips And Tricks
Ah, the attic! That mysterious upper chamber of secrets, old photo albums, and black mold? Yikes!
As eerie as attics can be, black mold is the real spook up there. But before you call a ghostbuster, take a deep breath (maybe not in the attic, though!).
Tackling black mold in the attic isn’t as terrifying as it might seem, especially when armed with the right tips and tricks.
So, grab your flashlight, and let’s embark on an attic adventure to banish black mold for good!
Why attics are mold hotspots
Alright, so let’s kick things off with a little attic 101! Why does mold, especially the notorious black mold, love setting up camp in our attics?
Limited Ventilation: Attics are often out of sight, and out of mind.
They typically have minimal ventilation, and that trapped, stagnant air makes them a hotbed for moisture build-up.
Mold’s all like, Cozy and damp? I’m moving in!
Roof Leaks: Ever had a small leak in the roof you didn’t even know about?
Rainwater can sneakily find its way into the attic, giving mold the perfect environment to grow.
A tiny drip here and there can lead to a big mold problem over time.
Insulation Issues: Insulation is great for keeping our homes warm, but if it gets damp?
You’ve got yourself a mold buffet. Wet insulation can trap that moisture for a long time, offering mold a scrumptious feast.
Rarely Checked: Be honest, when’s the last time you spent quality time in your attic?
It’s not a place we frequently visit, so mold can be partying up there for ages before it’s discovered.
Steps for attic mold eradication
Now that we’ve gotten a crash course in Mold’s Favorite Attic Hideouts, let’s jump into the game plan to give it the boot!
Assess the Situation: Before you dive in, give your attic a thorough once-over.
Sometimes the issue’s minor, other times you might think, Yup, I need a pro for this.
Ventilation is Key: Before you start any mold removal, make sure you’ve got some good airflow going.
Open up those attic windows or vents. This helps in reducing the moisture content.
Protect Yourself: Safety first, folks! Wear a mask, gloves, and protective eyewear.
Black mold isn’t something you want to inhale or touch.
Dry Out the Area: This could mean bringing in a dehumidifier, setting up fans, or just letting nature do its thing with open windows.
But remember, mold loves moisture. Our goal is to make the attic as inhospitable for it as possible.
Natural Cleaners: Try vinegar, baking soda, or tea tree oil to start. They can be surprisingly effective and don’t introduce harmful chemicals into your living space.
Stronger Solutions: If natural remedies aren’t cutting it, consider store-bought mold removers. Just ensure you follow the instructions and keep the area well-ventilated.
Replace Damaged Materials: Sometimes, there’s no saving damp and mold-infested insulation or wood. In those cases, it’s best to replace them to prevent mold’s return.
Fix Those Leaks: Remember our sneaky roof leaks? Make sure they’re patched up so you don’t find yourself back at square one.
Regular Check-ins: Once you’ve evicted mold from your attic, pop in every now and then for a quick check. Prevention is way easier than a full-blown mold removal operation.
Insulation Inspection: If your insulation was a mold magnet before, consider upgrading to mold-resistant types. It’s like rolling out an unwelcome mat!
Call in the Pros: If you’re ever in doubt, or the problem seems bigger than a DIY job, there’s no shame in calling for backup.
Professional mold removers have the gear and expertise to handle severe cases.
Remember, your attic doesn’t have to be mold’s favorite hangout spot.
With a bit of diligence and some trusty tips, you can reclaim that space and make it a no-mold zone! Happy cleaning!
Getting Rid Of Mold On The Ceiling: 17 Tips and Tricks
Ever find yourself lying in bed, gazing up at the ceiling, daydreaming… only to have your reverie rudely interrupted by unsightly and potentially hazardous mold spots?
Yep, ceilings, especially in rooms with lots of moisture, can become mold’s canvas.
But you don’t have to let mold be the ceiling Picasso! With the right know-how, your ceiling can go back to being that smooth, pristine surface that’s perfect for daydreaming.
Let’s roll up our sleeves, channel our inner interior decorator, and get that ceiling back in tip-top shape with some trusty tips and tricks!
Causes of ceiling mold
So, you’ve spotted some moldy freckles up there. First things first: let’s play detective and uncover the mystery of how they got there in the first place!
Condensation Central: Ever noticed how some rooms, like bathrooms or kitchens, tend to get steamy?
That’s prime condensation territory. When warm, moist air rises and meets a cold ceiling, water droplets form and create a haven for mold.
Roofing Riddles: A leaky roof can be sneaky. Sometimes, it’s not a deluge but just a few pesky drips that can cause a mold outbreak on the inner side of your ceiling.
Poor Ventilation: Without proper airflow, rooms can retain moisture. It’s like inviting mold for a sleepover and then realizing it never wants to leave!
Overzealous Humidifiers: While they’re great for many reasons, if they’re cranked up too high, they might be giving mold the moisture it craves.
Prevention and removal tactics
Alright, we’ve pinpointed the culprits. Now, onto the action-packed part: getting rid of that uninvited ceiling guest and making sure it doesn’t make a comeback!
Ventilation is MVP: Ensure rooms prone to moisture, like your bathroom or kitchen, have solid ventilation. Exhaust fans can be your best pals here.
Ceiling Fans for the Win: A good old ceiling fan can keep air moving and discourage moisture from settling in one place. Plus, it feels nice on a warm day!
Tidy Up Time: Before you tackle the mold, make sure to move furniture out of the way and cover everything with plastic sheets. Mold spores love to travel!
Gentle Start: Begin with soapy water and a scrub brush. Often, this combo can take care of minor mold issues.
Natural Warriors: Vinegar and baking soda aren’t just for volcanoes at science fairs. They can be effective against mold too. Apply, let sit, scrub, and rinse.
Tougher Challenges: For stubborn mold spots, consider mold-specific cleaners. They pack a punch but always ensure you’re in a well-ventilated space and wearing protective gear.
Seal the Deal: Once you’ve banished mold, you might consider painting the ceiling with mold-resistant paint. It’s like putting up a No Trespassing sign for mold.
Routine Checks: Regularly check for signs of water damage or leaks. Early detection can save you a lot of scrubbing later on.
Mind the Gap: Ensure there’s a gap between the ceiling and insulation in the attic. This promotes airflow and stops moisture from getting trapped.
Insulate Pipes: Pipes that run across the ceiling can sometimes sweat in warmer weather. Insulating them helps reduce this risk.
Watch the Humidity: Invest in a hygrometer to keep an eye on humidity levels. Aim to keep indoor humidity below 60%.
Roof Inspections: Schedule regular roof check-ups to ensure no minor leaks are giving mold an entry ticket.
Professional Consultation: If you’re uncertain about the mold situation or it keeps returning, consider bringing in a mold remediation specialist.
Their expertise can identify root causes and provide long-term solutions, ensuring you have peace of mind and a mold-free environment.
Remember, while mold might be persistent, with a mix of preventive measures and proactive steps, your ceiling can be a mold-free masterpiece in no time!
Should You Remove Drywall With Mold? 7 Easy Actionable Tips
Ever had that moment when you spot mold on your drywall and thought, Is this a DIY moment or a call-in-the-cavalry situation?
Trust me, we’ve all been there. Drywall and mold can be a tricky combo.
While sometimes it’s just about a good scrub and some preventive measures, other times it might be a signal to bid that piece of drywall goodbye.
We’re here to navigate this moldy maze together. With a handful of actionable tips, you’ll be making informed decisions about your drywall in no time. Let’s dive in!
The mold-drywall connection: Why it’s a challenge
Porous Partners: Think of drywall like a sponge. It’s super absorbent. This means when it gets wet, it tends to stay wet for a while.
And guess what? Mold absolutely loves these moist environments! It’s like a five-star resort for those pesky spores.
Behind-the-Scenes Drama: Often, what you see on the surface of the drywall is just the tip of the mold-berg.
There’s a high chance that mold has set up shop behind the scenes, lurking within the drywall’s layers.
The Slow Sneak: Drywall doesn’t always show immediate signs of water damage.
Sometimes, by the time you spot the mold, it’s been there for quite a while, setting up its moldy kingdom.
Assessing when to replace vs. clean drywalls
Surface Stains: If the mold is just on the surface and hasn’t penetrated deeper, with some effort and the right cleaning agents, it can often be removed.
Always remember to dry the area thoroughly after cleaning.
Deep Dive: If after cleaning the surface, the mold returns quickly, it’s a sign it’s set roots deeper into the drywall.
This might be the time to think about replacement.
Smell the Situation: You know that musty mold smell? If you’ve cleaned the mold but the scent lingers, it’s a clue that our moldy enemy might be hiding deeper within the wall.
Feel It Out: Drywall that feels soft, crumbles easily, or has become warped is not just a mold haven but also structurally compromised. It’s safer to replace rather than regret it later.
Safety First: Mold, especially certain types like black mold, can be harmful to health.
If you’re unsure about the mold’s nature, consulting a professional can be a good idea.
They can advise on whether cleaning or replacement is the best course of action.
Prevention’s Worth a Pound of Cure: Once you’ve tackled the current mold situation, it’s essential to find out why the mold appeared in the first place.
Addressing underlying issues like leaks or poor ventilation can help ensure you won’t be doing this whole mold dance again anytime soon.
Deciding between cleaning and replacing moldy drywall is a bit like deciding whether to mend or replace a beloved sweater.
It requires a keen eye, some know-how, and considering long-term happiness over short-term fixes.
But armed with these insights, you’re more than ready to make the right call!
Ozone And Mold – Does Ozone Kill Mold?
Ah, the battle between mold and modern methods! Enter ozone, the intriguing element we often hear about when discussing the environment, or fancy air purifiers.
But when it comes to the age-old problem of mold, can ozone truly be our shining knight?
The relationship between ozone and mold is like a captivating detective novel, filled with twists, turns, and the need for some serious sleuthing.
Buckle up, because we’re about to delve deep into the mystery of whether ozone really has what it takes to banish mold from our homes.
The science behind ozone’s mold-killing properties
Ozone 101: So, what exactly is ozone? It’s a molecule made up of three oxygen atoms.
While it sounds simple, this molecule has some impressive abilities. It’s a powerful oxidant, meaning it loves to react with other substances.
Mold’s Worst Enemy: When mold meets ozone, the ozone’s oxidizing power can break down the mold’s cell structure.
Imagine it like pouring a fizzy drink over a tough stain – the reaction between the two helps lift the stain away.
Not Just the Surface: What makes ozone stand out is that it doesn’t just clean the surface.
It penetrates into places we might not reach, like tiny crevices or porous surfaces.
So, when you use ozone against mold, it’s doing a deep clean, reaching spots that regular cleaning might miss.
Beyond Mold: It’s not just mold that feels the wrath of ozone. This molecule also can neutralize odors, bacteria, and viruses.
Safety concerns and effective usage of ozone for mold removal
A Double-Edged Sword: Remember when I said ozone loves to react? Well, that’s not always a good thing.
When we breathe in high concentrations of ozone, it can irritate our respiratory systems.
It’s a bit ironic but something that can purify air can also pollute it if not used correctly.
Not a DIY Job: This isn’t like lighting a scented candle to fix a bad smell. Using ozone generators requires a bit of knowledge.
It’s wise to follow the manufacturer’s instructions to the letter or even better, have a professional handle it.
Ventilation is Key: After an ozone treatment, ensure you ventilate the space thoroughly.
Let fresh air swoop in and carry away any lingering ozone. It’s a bit like airing out a room after painting.
You want to ensure the remnants of what you used to clean or fix the room don’t end up causing a new problem.
Pondering Pets & Plants: Just as ozone can be tough on our lungs, it can also be hard on our furry friends and green buddies.
If you’re using an ozone generator, it’s a good idea to ensure pets and plants are in a different space.
A Part of the Puzzle: While ozone can be a powerful tool against mold, it’s essential to remember that it’s just one piece of the mold-fighting puzzle.
Addressing the root causes of mold, like dampness or leaks, is equally crucial.
Ozone’s relationship with mold is a bit like a complex dance that’s potent and effective, but requires the right steps to ensure safety.
With knowledge and care, it can be a powerful ally in our quest for mold-free living spaces!
Understanding Mold Allergies: Symptoms and Solutions
Ever walked into a room and suddenly felt your nose start to tickle or your eyes begin to itch?
It might not just be that dusty old carpet or the cat. Sneaky culprits called mold allergies might be playing tricks on you!
When mold and our immune system clash, it’s like an unexpected dance-off in the middle of our bodies.
And trust me, it’s one dance-off you’d rather avoid. Let’s dive into the rhythm of mold allergies, spotting the dance moves (or symptoms) they bring, and how to gracefully bow out of this unwelcome jig.
Recognizing mold-induced health symptoms
Sneezes and Sniffles: First up on the list are the ever-so-annoying sneezes and sniffles.
If you suddenly start mimicking a pepper-sniffing cartoon character every time you enter a particular room, mold might just be your invisible nemesis.
The Itchy Eye Tango: You know that feeling when it seems like an invisible feather is poking at your eyes?
If your peepers are constantly itchy, watery, or red, it might be time to investigate for mold. It’s like they’re sending you a blinky Morse code: Mold Alert!
Skin Shenanigans: Mold doesn’t stop at making our noses and eyes jitterbug. If you find random rashes or itchy patches popping up on your skin, mold might be crashing your skin’s calm party.
Breathing Blues: Ever felt like you’re trying to breathe through a teeny-tiny straw?
Mold exposure can cause wheezing, shortness of breath, or even asthma flare-ups. It’s like having a tiny, unwanted marching band in your airways.
Throat’s Tiny Complaints: Persistent sore throat or that feeling like you swallowed a prickly cactus? Yep, mold might just be making your throat its dance floor.
Remedies and treatments for mold allergies
Antihistamines’ Magic Touch: Think of antihistamines as the bouncers of the allergy world.
They can help ease sneezing, itching, and runny nose by blocking the action of histamine, which is what our bodies release during an allergic reaction.
Nasal Sprays: For that stubborn stuffy nose, nasal corticosteroids come to the rescue.
These sprays help reduce inflammation and tackle symptoms right at the source. It’s like sending a tiny superhero up your nostrils!
Bronchodilators: If you’re facing those breathing blues, bronchodilators help open up the airways, making it easier to breathe. Picture them as tiny road workers clearing up a traffic jam in your lungs.
Allergy Shots (Immunotherapy): If other treatments are doing the cha-cha and not quite hitting the mark, allergy shots might be your tango. They gradually desensitize you to the allergen, meaning less severe reactions over time.
Mold-proof Your Living Space: Prevention, they say, is the best cure. Using dehumidifiers, repairing leaks, and ensuring proper ventilation can go a long way. It’s like setting up a No Dance Zone sign for mold in your home.
Dealing with mold allergies can feel like you’ve unwillingly signed up for a never-ending dance marathon.
But with the right steps and a little rhythm, you can twirl out of its grip and waltz into clearer, more comfortable days.
Natural Remedies for Mold Removal
Ever stumbled upon a splotch of mold and thought, Can I go all-natural on this pesky intruder?
Mother Nature has a few tricks up her sleeve that can help in keeping your home mold-free.
No need for harsh chemicals or complicated concoctions; just simple, effective remedies right from the heart of nature.
So, roll up those sleeves and let’s delve into the world of eco-friendly mold busters.
Household Items That Combat Mold
Vinegar to the Rescue: Ah, the versatile vinegar. Not just for salads or cleaning, but it’s also a great mold combatant!
Distilled white vinegar can be sprayed directly onto mold. Leave it for an hour, then wipe away with water.
And voilà! Just like a bad song, the mold fades away. Plus, the vinegar smell dissipates in no time, so no olfactory assaults.
Tea Tree Oil Takedown: Don’t be fooled by its pleasant name; tea tree oil means serious business when it comes to mold.
Mix a teaspoon of it with a cup of water, spray onto moldy areas, and watch as mold meets its match.
Remember, a little goes a long way, and always be cautious – it’s potent stuff!
Baking Soda, the Gentle Giant: Known mostly for deodorizing fridges, baking soda, when mixed with water, becomes a mold-fighting warrior.
Just apply the paste, scrub a bit, rinse, and you’re golden. Plus, it’s gentle enough for those surfaces that need a little extra TLC.
Grapefruit Seed Extract: Sounds fancy, doesn’t it? A few drops in water, and you have a solution that’s both effective against mold and free from strong odors.
Perfect for those of us who’d rather not announce our cleaning days to the whole neighborhood!
Hydrogen Peroxide Power: Commonly found in first aid kits, but guess what? It’s also a champ against mold.
A little spray, a little wait, and a wipe down. Just remember to store it in a dark place, as light weakens its strength.
Effectiveness and Limitations of Natural Remedies
Hits and Misses: While natural remedies can be fantastic, it’s worth noting they might not tackle all mold types with the same gusto.
Some molds are like that one kid in class who just won’t budge; they need a more stringent approach.
Surface Sensitivity: Some natural solutions might be better suited for certain surfaces.
For instance, while vinegar is great for tiles, you might want to think twice before unleashing it on porous surfaces.
It’s Not All Rainbows: Remember, just because it’s natural doesn’t mean it’s harmless.
Tea tree oil, for instance, is potent and should be kept out of reach of kids and pets.
Prevention is Key: While these remedies can work wonders, the best solution is always prevention.
Ensuring good ventilation, managing humidity, and regular checks can keep mold from making your home its dance floor in the first place.
Consult Before Committing: If you’re ever in doubt about what to use, especially in areas with significant mold infestations, it might be a good idea to consult with professionals.
So there you have it! Natural remedies that can help you keep your living spaces fresh, clean, and mold-free. Cheers to that cleaner, greener shine!
Mold Prevention: Creating a Moisture-Free Environment
Ah, mold prevention. Imagine your home as that crispy batch of cookies, fresh from the oven. Moisture? That’s the sneaky hand trying to snatch a cookie while they’re still cooling!
Keeping your living space dry is the secret recipe to prevent mold from gate-crashing your home’s party.
But how do you ensure your home stays as crisp and delightful as those cookies?
Let’s embark on a journey to create that perfect moisture-free haven and keep those moldy party crashers at bay.
Daily Habits to Prevent Mold Growth
Windows Wide Open: Ever heard of airing out your frustrations? Well, mold hates a good airing out, too!
Start your morning by cracking open a window, even if it’s just for a few minutes. This helps to circulate air and reduce dampness. Fresh air, fresh vibes!
Shower Shuffle: After that refreshing shower, resist the urge to leave the wet curtain clumped together.
Spread it out to allow it to dry faster. Bonus tip: A quick wipe-down of the walls with a squeegee or towel reduces moisture even more.
Plant Patrol: Plants are the soul of a home, right? But over-watering them can make them mold magnets.
So, show your green friends some love but ensure the soil isn’t constantly soggy.
Dish Duty: If you’ve got a pile of wet dishes, it’s tempting to leave them for future you.
But a quick towel drying or even letting them air dry in a rack can be a simple step to reduce excess moisture.
Laundry Lowdown: Wet clothes in the washing machine are like a VIP invitation for mold.
Make it a habit to immediately transfer your laundry to the dryer or hang them out.
No more unintentional mold parties in the laundry basket!
Home Modifications for a Mold-Resistant Environment
Dehumidify Your Days: Investing in a dehumidifier can be a game changer, especially in areas prone to dampness like basements.
Keep the humidity levels below 50%, and you’ll have a drier, happier home.
Ventilate, Ventilate, Ventilate: Install exhaust fans in places like the bathroom and kitchen.
These fans are like the bouncers of the club, ensuring mold doesn’t get in.
Landscaping Love: Ensure the ground slopes away from your home’s foundation.
This prevents water from collecting and seeping into your home. Plus, it’s a great excuse for a garden makeover!
Roofing Rundown: Regularly check for and repair any leaks in your roof. Water stains on the ceiling?
It’s like mold’s version of writing on the wall, signaling it’s time for some roof TLC.
Basement Bliss: If your basement feels more like a swamp, consider using a waterproof sealant on its walls.
It’s like giving your basement the perfect raincoat to keep out unwanted moisture.
Window Wisdom: Ensure window sills and doors are sealed tight. It’s a simple step, but think of it as shutting the door in mold’s face – politely, of course.
Mold might be persistent, but with these daily habits and home tweaks, you’re setting up a solid defense.
So, here’s to a mold-free, moisture-free, carefree living space!
The Financial Impact of Mold: Costs and Remediation Expenses
Ever heard of the saying, A stitch in time saves nine? In the world of homeownership, mold can be that sneaky thread that unravels your well-knitted financial sweater.
While mold may start as a tiny, seemingly harmless speck, it can snowball into an avalanche of unexpected expenses.
Let’s dive deep into the pockets (and not-so-hidden corners) of our homes to understand the true cost of mold and how to prevent those surprise bills from popping up.
Ready to be a mold-money maestro? Let’s waltz through this financial dance!
Direct Costs: Mold Removal and Home Repairs
The Mold Medics: First things first, if you’ve got mold, chances are you’ll need the pros to diagnose the situation.
Professional mold inspections can range anywhere from $300 to $900 or more. It’s a bit like calling in the detectives to scope out the scene!
Treatment Time: Mold removal isn’t a one-size-fits-all gig. Depending on the severity and area covered, you could be looking at a bill from $500 for a small patch, to a whopping $30,000 for an entire home invasion.
Home Rehab: Mold doesn’t just chill on the surface; it’s got a knack for sinking its teeth deep.
This means, sometimes, repairs are in order. Replacing mold-infested drywall, flooring, or even entire sections of a home can quickly add up.
And like giving your home a facelift, these repairs can range from a few hundred to several thousand dollars.
Gear Up: Part of the mold removal process may require specific equipment rentals, like air scrubbers or dehumidifiers.
Indirect Costs: Health Implications and Property Value Impact
Sniffles and Sneezes: Mold doesn’t just attack structures; it can take a toll on our health too.
Allergies, respiratory issues, or even more severe health complications can lead to frequent doctor visits, medications, and missed workdays.
And let’s be real: feeling under the weather is no picnic, and neither are the medical bills that can come with it.
Home Sweet (Less Valuable) Home: Let’s chat real estate. A home with a history of mold can be a tough sell.
Potential buyers might be wary, and your property’s value can take a hit.
It’s a bit like trying to sell a car that’s known to have had engine troubles.
Even after remediation, you might need to drop the price or invest in home upgrades to make the sale more appealing.
Insurance Woes: Sometimes, mold damage might not be covered by your homeowner’s insurance, especially if it’s due to neglected maintenance.
That’s right! Those premium payments don’t always have your back when mold’s in the picture.
Emotional Toll: Can’t put a price tag on peace of mind, right? The stress and disruption of dealing with mold, relocating temporarily, or feeling unsafe in your home space? That’s an indirect cost that’s worth noting.
Navigating the mold maze can feel overwhelming, but by understanding the financial implications, you’re better equipped to tackle the problem head-on and ensure your home and wallet remain in shipshape!
Conclusion and Recap
Whew, what a journey we’ve been on together! From the sneaky nooks and crannies mold loves to hide in, to the very real costs and solutions to tackle this persistent pest, we’ve covered a lot of ground.
But before we part ways, let’s take a moment to recap our adventure and tie up any loose ends.
Grab your favorite mug, take a deep breath, and let’s wrap up this moldy mission together. Ready to reminisce? Let’s roll!
Reiterating the Importance of Timely Mold Removal
It’s a classic case of better sooner than later. When it comes to mold, this saying is gold.
Picture this: It’s a sunny day, and there’s a small puddle on your porch from last night’s rain.
By evening, that puddle’s vanished, right? Similarly, when mold is caught early, it’s like a small puddle that can easily dry up.
But let it linger, and, oh boy, does it get messy. Timely mold removal not only saves your walls, ceilings, and furniture from damage but also plays a huge role in maintaining the air quality of your home.
Remember, each day mold stays, it’s like an uninvited guest that’s overstaying its welcome, potentially jeopardizing your health and home’s structural integrity.
Steps for Continued Mold Prevention and Home Care
So, we’ve established that mold is that guest we never really wanted. But how do we make sure it doesn’t pop up again?
First, always keep an eye out for damp spots, especially after a rainy spell.
Invest in a good dehumidifier if you live in particularly moist regions, and make it a habit to air out rooms regularly.
Think of your home as a living, breathing space that needs fresh air now and then.
Also, ensure there’s good ventilation in high-moisture zones like bathrooms and kitchens.
Occasionally, check for leaky pipes or roof issues. It’s like giving your home a health checkup.
Keep things dry, and you’ll find that mold will have a tough time making a comeback. Happy home caring!