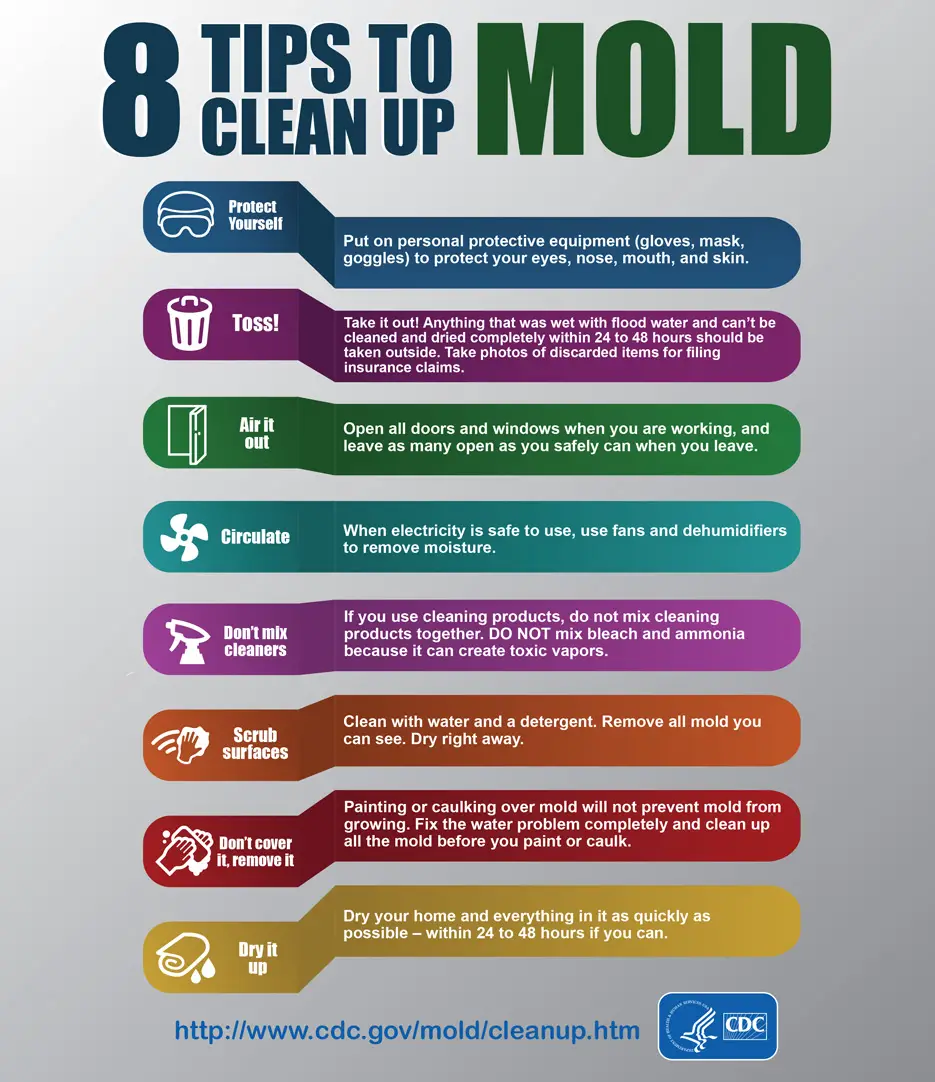
Discover the latest mold remediation tips and tricks in our guide! Dive in, get informed, and make your space mold-free and fresh. Let’s tackle it together!
Mold Remediation Tips
Mold removal techniques are methods used to eliminate mold growth in homes and buildings. These techniques range from natural solutions like vinegar and baking soda to professional-grade treatments. Effective mold removal not only addresses visible mold but also prevents future growth by targeting underlying moisture issues.
Ever walked into a room and been hit with that musty, unwelcome smell? Yep, that’s mold making its unwanted appearance!
But with the right mold removal techniques, you can wave goodbye to these pesky intruders.
Dive into our comprehensive guide on Mold Remediation Tips, and let’s turn your space from a ‘moldy mess’ to ‘sparkling fresh’ together!
An Introduction to Mold and its Dangers

Alright, let’s talk about that sneaky guest none of us invited into our homes: mold. You’ve probably seen it, that fuzzy stuff lurking in damp corners.
But did you know it’s more than just an unsightly nuisance? That’s right, mold comes with a baggage of potential dangers.
So, before we jump into how to evict it, let’s get to know our uninvited guest a bit better and understand why it’s so crucial to show it the door.
Brief overview of what the article covers
Hey there, mold detective! By diving into this piece, you’re about to embark on a mold-busting journey.
We’re going to uncover what mold really is, why it’s more than just an aesthetic eyesore, and the health hiccups it can cause.
Consider this your one-stop shop to understand and combat mold!
Definition of mold
Let’s start with the basics. Mold is a type of fungus.
Now, I know fungus might make you think of mushrooms in a forest, but molds are the sneaky cousins that thrive in damp, dark places.
They spread by releasing tiny spores that fly around invisibly in the air.
When these spores land somewhere cozy and wet, they set up camp and grow. Hence, those unsightly patches on your wall or ceiling.
Reasons for concern about mold growth
So, why all the fuss about mold? Beyond the fact that it’s not the best décor choice, mold can damage your home’s structure.
It can rot wood, peel paint, and degrade different materials. But that’s not all! Its presence can also reduce your home’s value.
And trust me, nobody’s jumping at the chance to buy a house with a mold problem. Most important though, is the impact it can have on your health, which brings us to our next point.
Health implications of mold exposure
Now, here’s the real kicker. While a few mold spores won’t do much harm, prolonged exposure is a different story.
For some, mold can trigger allergic reactions, causing stuffy noses, itchy eyes, and skin rashes.
For others, especially those with weakened immune systems or mold allergies, the implications can be more severe, leading to respiratory issues and more.
So, it’s not just about the unsightly black spots. It’s about keeping you and your loved ones healthy and safe.
Understanding Different Types of Mold
 Alright, so we’ve established that mold isn’t exactly the roommate we want.
But did you know it’s not just a ‘one-size-fits-all’ kind of pest?
There’s a whole world of mold types out there!
Some molds just want to ruin your wallpaper, while others are a bit more mischievous.
Let’s delve into the different characters in the mold family, understand their quirks, and figure out how to spot them. Knowledge is power, right?
Characteristics and overview of common mold types
Alrighty, let’s set the scene. Imagine mold as this extensive family tree. Each member, or type, has its own little habits, favorite hangout spots, and, yep, even color.
While they all fall under the fungi umbrella, their individual characteristics set them apart. Time to meet some of the most popular members of the mold family.
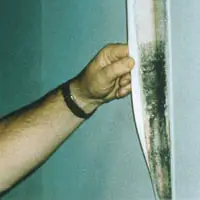
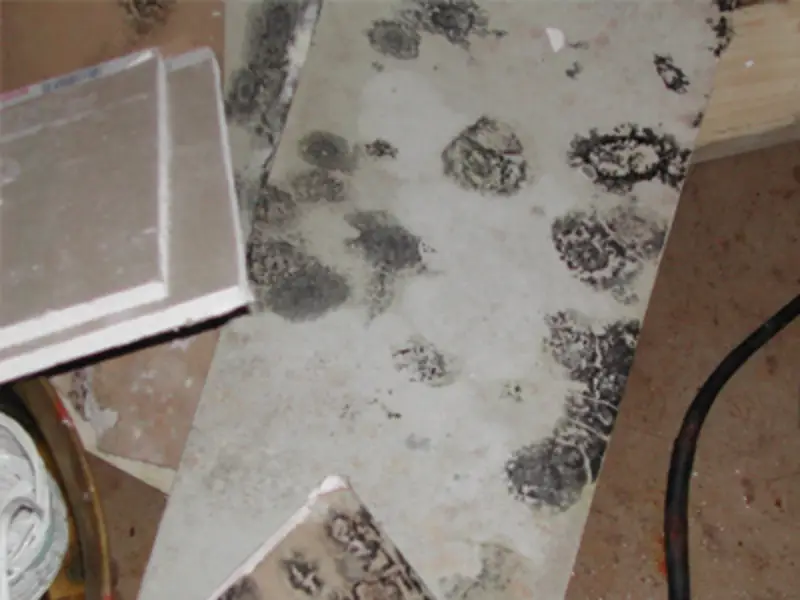
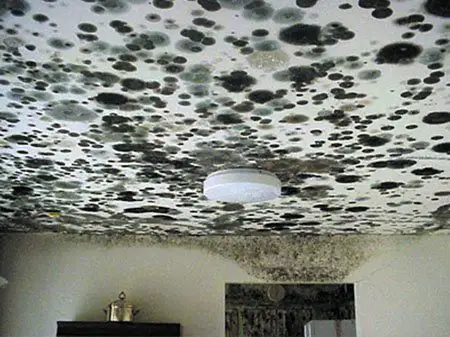
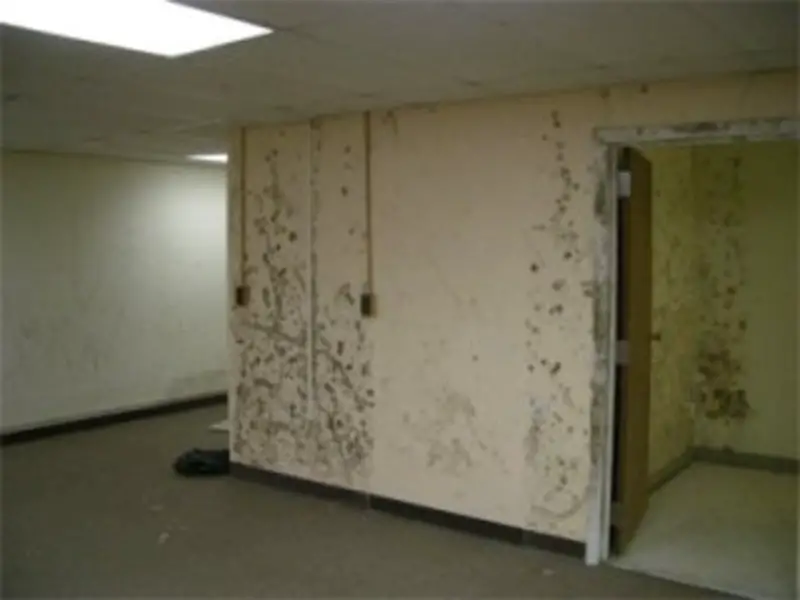
Black mold

Enter the notorious one: black mold, also known by its fancy name, Stachybotrys chartarum.
This dark and moody type thrives in continually wet areas, like leaky pipes or flooded homes.
Besides its black or dark green appearance, it’s often slimy to the touch.
What makes it famous (or infamous) isn’t just its color, but also the potential health concerns it can bring along. Word to the wise? If you spot it, act fast!
White mold
On the opposite end of the spectrum, we’ve got white mold. It’s a bit trickier to spot since it often looks like a powdery, white substance. Think of it like the snow of the mold world.
But here’s the twist: it’s not always just mold. Sometimes, it can be efflorescence, a fancy term for crystalline deposits of salts often seen on walls.
Regardless, if you spot this white powdery guest, it’s worth getting it checked out.
Others
Beyond the black and white molds, there’s a rainbow of mold out there. Green, blue, yellow, you name it!
There’s Penicillium (the blue/green stuff often found on expired food), Aspergillus (often appearing yellow or green), and even Cladosporium (which can be brown or green).
Each has its own favorite spot and behavior. It’s like a moldy box of crayons!
Visual cues and identification tips
 So, how do you play detective and identify these molds? Look for irregular patches or spots, often in damp or humid areas.
The color can give you clues, as we discussed. Also, trust your nose! A musty smell is a classic mold giveaway.
But remember, while being a mold detective can be fun, if you’re unsure or concerned, always call in the professionals. After all, they’re the real mold superheroes!
Getting Rid Of Black Mold On Drywall: 5 Tips and Tricks
Okay, picture this: you’re sipping on your morning coffee, casually glancing around the room, when BAM!
You spot it. A smudge of black mold stealthily creeping up your pristine drywall.
Before panic sets in, let’s take a deep breath. We’ve got your back!
Arm yourself with these 5 top-notch tips and tricks for getting rid of mold on drywall, and you’ll send that pesky black mold packing in no time. Ready to become a mold-fighting ninja?
Introduction to mold issues on drywall
Alright, before we jump into the nitty-gritty, let’s get a handle on the situation.
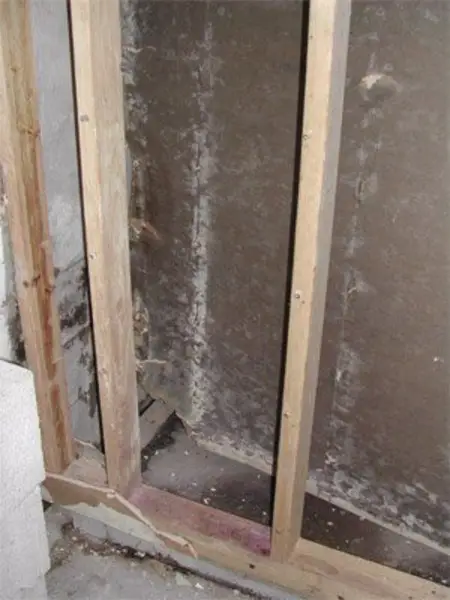
Drywall is like that sponge you left out after washing dishes it’s absorbent.
Given the right conditions, mainly moisture, this wall of ours becomes a cozy bed-and-breakfast for black mold.
And here’s the kicker: drywall, with its porous nature, can soak up moisture like nobody’s business, making it a hotspot for mold growth.
Let’s just say, it’s like offering mold an all-you-can-eat buffet!
Causes and prevention
So, how does this sneaky mold even get there? A couple of culprits are behind it.
Leaky pipes, poor ventilation, floods, and even that time you left the window open during a rainstorm can invite moisture in.
Now, prevention? It’s all about keeping things dry and airy.
Ventilate rooms, especially bathrooms and basements, fix those pesky leaks, and consider a dehumidifier if you’re in a particularly damp environment.
It’s like telling mold, Sorry, no room available at this inn!
5 actionable tips and tricks for hard surfaces
Time to roll up those sleeves and get down to business! Here’s your mold-fighting arsenal for hard surfaces:
Soap and Water: Sometimes, the simplest solutions are the best. Scrub the affected area with a mixture of soap and water. It can be surprisingly effective!
Vinegar: Nature’s disinfectant. Spray undiluted white vinegar on the mold, let it sit for an hour, then wipe away. The bonus? It helps prevent future growth.
Baking Soda: Mix it with water to form a paste, or dissolve it in water and spray. Either way, it’s a gentle yet effective mold buster.
Tea Tree Oil: A bit pricier, but oh-so-effective! Mix a teaspoon of tea tree oil with a cup of water, spray, leave it to sit, then wipe.
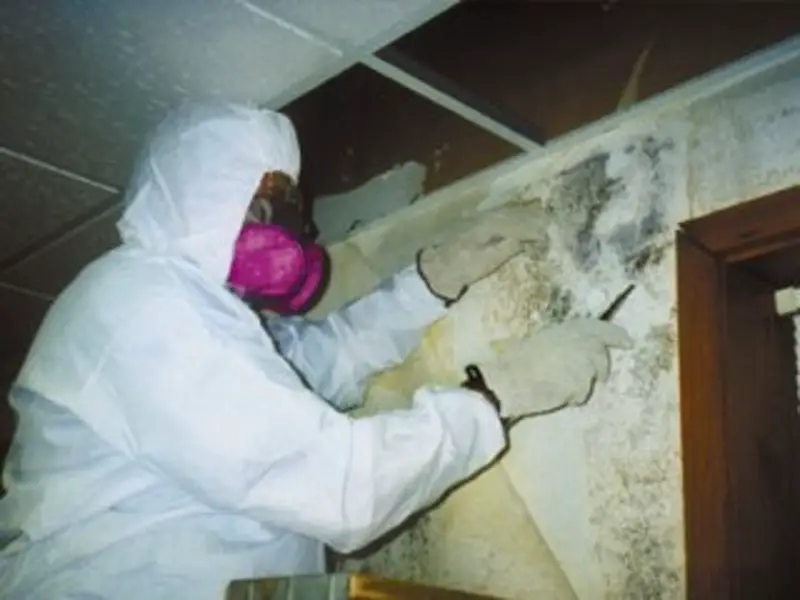
Safety First: Remember to wear gloves, goggles, and a mask when dealing with mold. And ensure the room is well-ventilated.
Remember, if the mold situation feels overwhelming or if it’s a recurring issue, it might be time to bring in the pros.
After all, there’s no shame in calling in reinforcements!
Removing mold from drywall can be a bit tricky since drywall is porous and mold can penetrate its surface.
Here are five actionable tips and tricks specifically for removing mold from drywall:
Safety First:
Before you start, ensure you’re wearing proper safety gear. This includes gloves, a mask (preferably N95), and protective eyewear. Keep the area well-ventilated to avoid inhaling mold spores.
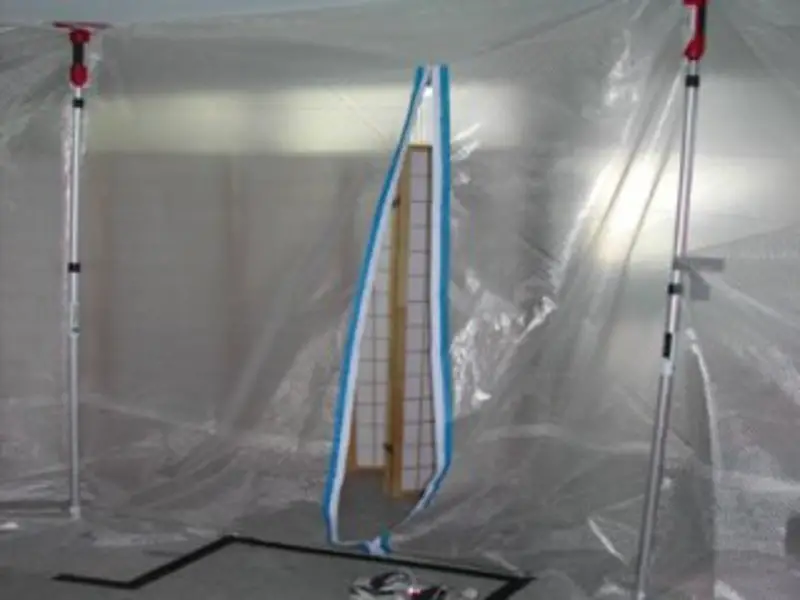
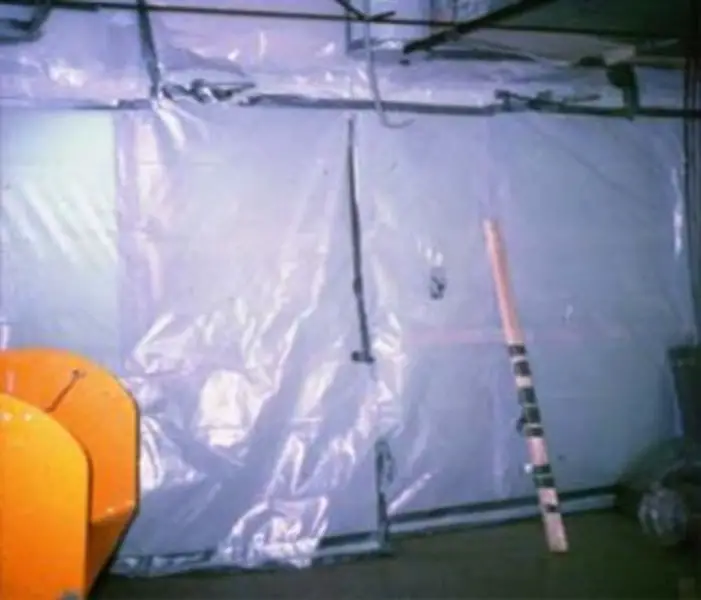
Isolate the Affected Area:
Before starting, seal off the moldy room from the rest of the house to prevent spores from spreading.
You can use plastic sheeting and tape to create a barrier. Also, cover vents, electrical outlets, and other openings.
Test for Moisture:
Before you get to the actual mold removal, identify any moisture sources causing the mold.
It might be a leak, poor ventilation, or something else. Ensure that this source is dealt with, or the mold will just come back.
Cut Out and Replace:
Often, the most effective way to deal with moldy drywall is to cut out the affected area and replace it.
Using a utility knife, cut out the moldy section, making sure to extend your cut a bit beyond the visibly affected area.
Once removed, place the moldy piece in a heavy-duty plastic bag, seal it, and dispose of it properly.
Treat the Area:
After removing the visibly moldy sections, treat the surrounding area with a mold-killing solution to ensure that any residual mold spores are eradicated.
While there are commercial solutions available, a mixture of water and white vinegar sprayed onto the area can also be effective.
Let it sit for an hour and then wipe away any excess solution.
Remember, mold thrives in damp environments, so once you’ve treated the moldy drywall, ensure that the room remains well-ventilated and dry to prevent future outbreaks.
If mold keeps returning or is widespread, consider consulting with a mold remediation professional.
The Importance of Proper Ventilation in Preventing Mold
Alright, let’s chat about something we often take for granted: the simple act of breathing in and out.
Now, imagine your house doing the same thing! Sounds quirky, right?
But proper ventilation is your home’s way of ‘breathing’ and plays a starring role in keeping mold at bay.
Think of it as your home’s invisible shield against these unwelcome guests.
Ready to dive into why it’s so vital and how you can ensure your house takes those essential deep breaths? Let’s go!
Role of ventilation in mold prevention
Picture this: a house wrapped up super tight, not letting any air in or out. It sounds secure, right?
But, in reality, it’s a playground for mold. See, mold spores adore stagnant, moist air and it’s like a five-star resort for them.
When we ventilate, we disrupt this cushy environment, bringing in fresh air and flushing out the dampness.
Essentially, proper ventilation ensures that moisture doesn’t have the time or the place to settle down and invite mold over.
It’s like hosting a party and not inviting the one person who always causes a ruckus.
Tips for improving indoor airflow
Breathing life (and fresh air) into your home isn’t rocket science. Here are some simple yet effective ways:
Open those windows! Even just a few minutes every day can make a huge difference. Think of it as your home’s morning stretch.
Fans are your friend: Whether it’s a ceiling fan or a standalone, they circulate air and ensure it doesn’t get too cozy in damp corners.
Exhaust fans: Especially important in areas like kitchens and bathrooms. They suck out steamy, moisture-laden air.
Mind the gaps: Ensure there’s space between furniture and walls. It promotes airflow and stops moisture from getting trapped.
Consider an air exchanger: If you’re in a particularly humid environment, an air exchanger can help balance the inside and outside air.
Common areas of concern and solutions
Some parts of our homes are more ‘mold-friendly’ than others. Here’s looking at you, bathroom and basement!
Bathrooms: With all that steam from showers and baths, it’s a mold’s paradise.
Ensure you’ve got a working exhaust fan, and try to keep the door open post-shower to let out steam.
Basements: Often cooler and damper, basements are a mold’s dream home.
Consider using a dehumidifier and ensure gutters and downspouts are directing water away from your foundation.
Attics: Surprised? Attics can trap heat and moisture, especially if not well-ventilated. Check for proper vents and insulation.
Remember, it’s all about balance. Let your home breathe, and you’ll be taking huge strides in keeping mold off the guest list!
Mold Removal Techniques
Ever walked into your favorite café and wondered how the barista crafts that perfect latte art? It’s all about technique.
Similarly, in the world of mold battles, the method matters. Just squishing that pesky mold away won’t cut it.
To truly say goodbye, we need the right mold removal techniques up our sleeves.
So, if you’re ready to become the barista of mold removal, ensuring no trace remains, let’s dive into the techniques that get the job done!
General introduction to removal techniques
Let’s set the stage first. When it comes to evicting mold from our spaces, it isn’t just about shooing it away.
Like preparing the finest dish or crafting the most exquisite coffee, the approach matters.
Mold, for all its sneakiness, is resilient. So, whether you’re dealing with a small patch behind your couch or an overtaken basement, the right mold removal technique is your recipe to success.
It’s a blend of understanding the mold, ensuring safety, and methodically eradicating it.
Pre-removal precautions
Before we dive into the actual removal, here’s our prep talk. Think of it as the mise en place before cooking.
Safety First: Gear up! Don a pair of gloves, safety goggles, and a mask. This isn’t just a fashion statement; it’s crucial to protect yourself from mold spores.
Isolate the Area: If possible, seal off the mold-infested area. We’re aiming to avoid letting those spores wander into other rooms. Think plastic sheets and tape!
Ventilate: Open windows or use fans, but make sure they’re directing air outwards. The goal? Get those mold spores out of the house.
Know When to Call in the Pros: If you’re dealing with a large area (typically over 10 square feet) or if the mold is due to sewage or contaminated water, it might be time to ring in the experts.
Step-by-step guide
Roll up those sleeves, it’s action time!
Assess and Prepare: Before anything, evaluate the extent of the mold. Understand its type and decide whether DIY is a go or if it’s expert-time.
Protect Your Belongings: Move unaffected items out of the area. For items with mold, decide if they’re salvageable. Sometimes, it’s better to part ways.
Start with Soap and Water: Simple, yet often effective. Scrub the affected area diligently.
Try Natural Solutions: White vinegar or baking soda can be handy allies. Apply, let them sit, then scrub away.
Consider Commercial Mold Removers: If natural methods aren’t cutting it, you might need something stronger. Always follow label instructions.

Dry the Area Completely: Post-cleanup, ensuring everything is bone dry is key. Mold loves moisture, remember? Use fans, open windows, or dehumidifiers to get the job done.
Regularly Monitor the Area: Once you’ve tackled the problem, keep an eye out. Regular checks ensure it doesn’t make an unwelcome return.
Whew! With determination, the right techniques, and maybe a dash of elbow grease, you’re well on your way to reclaiming your space from mold’s clutches!
DIY Mold Remediation: 13 Important Facts
Pop quiz: What do home-renovation TV shows and mold have in common? They both make us think, ‘Hey, I can totally DIY that!’
But while slapping on a fresh coat of paint might seem straightforward, mold remediation is a whole different ball game.
We’re not here to deter your DIY spirit! Instead, we’re serving up 13 must-know facts that’ll transform you from a mold-fighting novice to a DIY mold remediation rockstar.
Ready to dive into the deep end of DIY mold know-how? Let’s roll!
Setting expectations: when DIY is appropriate
Okay, first thing’s first. While we’re all about that DIY spirit and the undeniable satisfaction of tackling challenges head-on, but mold remediation isn’t always a walk in the park.
If you’re facing a small patch of mold, say, from that water spill you forgot about, then yes, roll those sleeves up!
But if your entire basement looks like it’s auditioning for a horror film or if mold is due to something heavy-duty like flooding, it’s wise to tap out and call the experts.
Remember, it’s about health, safety, and ensuring mold doesn’t get an encore.
Key considerations before starting
Before diving in, let’s prep our toolbox with some essential considerations:
Safety First: Mold isn’t just unsightly; it can be harmful. Always gear up with gloves, goggles, and a mask.
Know Your Mold: Understanding the type of mold you’re dealing with can help tailor your removal strategy.
Gauge the Area: If mold covers a large space (typically over 10 square feet), reconsider the DIY route.
Ventilation is Key: Always work in a well-ventilated space. We want those spores out, not in.
13 facts every DIY enthusiast should know
1. Mold Loves Company: Mold thrives in damp, dark, and humid places. So, that leaky faucet or basement? Prime real estate.
2. Not All Mold is Visible: Sometimes, mold lurks beneath surfaces or behind walls. Trust your nose; that musty smell is a telltale sign.
3. Bleach Isn’t Always Best: While popular, bleach doesn’t prevent mold from returning and isn’t effective on porous surfaces.
4. Natural Remedies Rock: White vinegar and baking soda can be effective mold fighters. Plus, they’re eco-friendly!
5. Dryness is a Mold Deterrent: Post-cleaning, always ensure the area is thoroughly dry. Use fans or dehumidifiers.
6. Prevention is Better than Cure: Regularly check and fix leaks, and ensure good ventilation to keep mold at bay.
7. Mold Can Harm Health: Prolonged exposure can lead to respiratory issues, allergies, and other health concerns.
8. Paint Won’t Solve it: Painting over mold won’t kill or seal it. Always clean mold before repainting.
9. DIY Isn’t Always Cheaper: Depending on the infestation’s extent, DIY methods might end up costlier in the long run.
10. Mold Spreads Easily: Disturbing mold can release spores, causing it to spread. Always seal off your working area.
11. Dispose of Moldy Items Carefully: Items like rags or moldy drywall should be sealed in bags before disposal.
12. Regular Checks are Vital: Once you’ve treated an area, periodically check to ensure mold doesn’t return.
13. Stay Informed: Before starting, do your research. The more you know, the better equipped you’ll be.
Alright, with these facts in your DIY toolkit, you’re poised to approach mold remediation with knowledge, confidence, and a sprinkle of caution! Go get ’em, tiger!
Toxic Black Mold Removal – Black Mold Cleanup
Picture this: You’re watching a suspenseful movie, and there’s that eerie, dark shadow lurking in the background, spelling doom.
In our real-life homes, toxic black mold plays a similar role, lurking in corners, presenting not just an eyesore but real health risks.
But we’re here to pull back the curtains on this villain, demystifying toxic black mold, and equipping you with all the know-how for a thorough cleanup.
Ready to tackle this dark nemesis? Let’s dive in and light up those shadowy spots!
Introduction to toxic black mold
So, let’s kick things off with a quick crash course on our main antagonist here: toxic black mold.
Its fancy scientific name? Stachybotrys chartarum. But you can just call it that pesky black mold if you prefer.
This mold is a dark greenish-black and loves to grow on high-cellulose, low-nitrogen materials, which includes items like gypsum board, paper, dust, and lint that’s frequently exposed to moisture.
It doesn’t just barge in unannounced; it thrives where there’s consistent moisture, like leaks or floods.
Knowing its favorite hangout spots is step one in our mold-busting journey!
The dangers and health risks
While black mold might sound like something out of a thriller, its health risks are very real.
Breathing in those sneaky spores can lead to a host of symptoms.
We’re talking about chronic coughing, sneezing, eye irritation, rashes, and persistent headaches.
For folks with asthma, allergies, or immune-compromising conditions, the effects can be even more severe.
And let’s not forget, long-term exposure can sometimes lead to more chronic conditions.
Safe to say, this isn’t a roommate we want sticking around!
Recommended cleanup techniques
Alright, armed with knowledge, it’s time to take action! But where to start? Here are some tried and tested methods:
Suit Up: Before waging this battle, gear up. Protective clothing, gloves, goggles, and a high-quality mask are non-negotiable.
Seal the Area: Use plastic sheets and tapes to seal off the affected area. This keeps spores from playing tourist in the rest of your home.
Keep it Dry: Remember, moisture is this mold’s BFF. Use dehumidifiers and fans to keep the area bone dry before, during, and after the cleanup.
Scrub with Soap and Water: Start with the basics. Often, a thorough scrubbing can do wonders.
Natural Solutions: White vinegar can be effective against mold. Spray it, let it sit for an hour, then wipe away.
Consider Commercial Products: For stubborn spots, you might need a commercial mold remover. Always read and follow instructions carefully.

Dispose of Damaged Items: Sometimes, it’s best to part ways with heavily mold-infested items. Seal them in plastic bags before disposal.
Post-Cleanup, Stay Vigilant: Once the mold is gone, keep an eye out. Regular checks and maintaining a dry environment will keep the pesky mold from making a comeback.
And there you have it! With the right knowledge and techniques, you’re not just ready but fully equipped to send toxic black mold packing! Safe travels, mold, and don’t come back!
Does Black Mold Removal With Bleach Work? 5 Better Choices
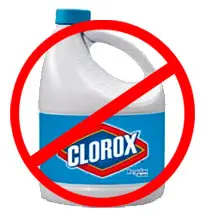
Ah, bleach. The old household standby. Spill some wine on the carpet? Some swear by bleach.
Trying to revamp that faded tee? Bleach tie-dye to the rescue!
But when it comes to evicting the notorious black mold from our homes, is bleach really the superhero we’ve all believed it to be?
Spoiler alert: there might be some plot twists in this tale.
Dive in with us as we unravel the mystery of bleach vs. black mold, and line up 5 alternatives that might just steal the spotlight!
Debunking the bleach myth
Alright, before we pull the rug out from under bleach’s feet, let’s get a few things straight.
For many of us, bleach has been the go-to for, well, pretty much anything that needs a solid clean.
It’s the household equivalent of a default solution.
But here’s the plot twist: while bleach does a bang-up job at making mold look gone (because it bleaches its color away), it might not be completely evicting our fungal friend from the premises.
On porous surfaces like wood or drywall, bleach can’t penetrate deep enough to kill the root of the mold.
Instead, it stays on the surface, letting mold’s roots laugh in the face of danger and come back stronger another day.
So, to put it mildly, bleach might be a little overhyped in the mold-removal department.
Risks associated with using bleach
Now, if you’re clutching your trusty bottle of bleach, wondering where it all went wrong, there’s a bit more to the story.
Using bleach, especially in areas with poor ventilation, can come with its own set of hazards.
Inhaling its fumes can be harmful, causing respiratory irritation, headaches, and more.
Plus, mix bleach with other household cleaners (like ammonia), and you’re cooking up a recipe for toxic fumes.
And remember, bleach is a harsh chemical. Spill some on your favorite pair of jeans, and it’s a tearful goodbye.
Not to mention, it can also corrode surfaces and materials over time. So, all in all, bleach has its place, but perhaps mold removal isn’t its starring role.
5 alternative, more effective solutions
1. White Vinegar: Ah, our trusty, versatile friend! White vinegar is mildly acidic, making it a mold’s nemesis. Simply spray it on the moldy area, let it sit for an hour, and scrub away. The bonus? It’s natural and doesn’t leave harmful residues behind.
2. Baking Soda: Not just for cookies! Mix it with water to form a paste or dilute it for a spray. After application, scrub, rinse, and say hello to a mold-free area.
3. Hydrogen Peroxide: In the realm of mold-fighters, this one’s a heavyweight champion. It’s anti-fungal, antibacterial, and can even tackle that pesky black mold. Spray a 3% concentration on the mold, let it sit for 10 minutes, and scrub.
4. Tea Tree Oil: A bit on the pricier side, but boy does it pack a punch! Mix a teaspoon of it with a cup of water, spray, let it sit, and wipe. Plus, it smells a lot better than bleach!
5. Grapefruit Seed Extract: Another natural remedy that’s a powerhouse against mold. Its citric acid content gets down to business, eliminating mold at its roots. Dilute about 20 drops in 2 cups of water, spray, and let it work its magic. No need to rinse!
And there you have it! While bleach might have been our childhood superhero, as we grow, so does our understanding.
With these alternatives, mold doesn’t stand a chance, and neither do those pesky bleach stains on our clothes!
Natural Mold Remediation Solutions
When mold decides to gatecrash our homes, it’s tempting to reach for the harshest chemicals in our arsenal.
But what if I told you there’s a gentler, more Earth-friendly way?
Mother Nature, in her infinite wisdom, has given us a treasure trove of solutions that not only evict these unwelcome guests but also leave our homes smelling fresh and our conscience clear.
Ready to explore these green alternatives? Let’s dive into the world of natural mold remediation solutions and give a nod to nature’s brilliance!
Introduction to organic mold removal
Alright, nature enthusiasts, let’s set the scene.
Picture a world where the answers to our moldy problems aren’t found in plastic bottles filled with unpronounceable chemicals, but rather in our pantry, garden, or local health store.
Sounds dreamy, right? Organic mold removal is all about leveraging the power of nature’s own arsenal to combat mold.
It’s a beautiful blend of old-world wisdom and modern-day eco-awareness. And the best part? No hazmat suit required!
Benefits of natural solutions
Why go natural, you ask? Well, pull up a chair:
Eco-Friendly: No toxic runoffs, harmful residues, or chemicals down the drain. Mother Earth sends her regards!
Safe for Kids and Pets: No more chasing your fur baby away from freshly cleaned areas or worrying about little fingers touching harsh chemicals.
Kind to Your Wallet: Many of these solutions might already be hanging out in your home, saving you a trip to the store and a few bucks.
Allergy-Friendly: Chemical solutions can sometimes trigger allergies or asthma. Nature’s alternatives? Much gentler on the senses.
Vinegar
The trusty bottle of white vinegar in your pantry isn’t just for salad dressings. It’s acidic, which means mold spores look at it the way vampires look at garlic.
Simply spray undiluted vinegar on the moldy surface, let it sit for an hour, then wipe away with water. And don’t worry, that vinegary smell disappears as it dries!
Baking Soda
Oh, the magic of baking soda! This little white powder is mildly abrasive (great for scrubbing), and it also absorbs moisture, which is often the root cause of mold growth.
Mix it with water to create a paste for tougher spots or dilute it in a spray bottle for wider coverage. Scrub, rinse, and revel in the cleanliness!
Tea Tree Oil
 A bit pricier, but boy, is it worth every penny. This essential oil is antifungal and antibacterial. A little goes a long way. Mix a teaspoon with a cup of water in a spray bottle, spray it onto the moldy area, let it sit, and then wipe away. The scent? Earthy and fresh.
Others (only good on hard surfaces!)
Remember, the following are stars on hard surfaces but might not be MVPs on your plush couch or favorite rug:
Grapefruit Seed Extract: Its citric acid annihilates mold. A few drops in water, spray, wait, and wipe.
Hydrogen Peroxide: A bubbly solution that’s fantastic on tiles and ceramics. Spray a 3% solution, let it fizz, scrub, and rinse.
Lemon Juice: Its high acidity works wonders on mold. Plus, who can resist that zesty scent?
Voila! With these natural warriors by your side, mold doesn’t stand a chance.
Remember to always do a patch test before going all out, especially on colored surfaces. Happy cleaning, nature-lovers!
Mold Abatement Procedures-9 Steps To Successful Mold Remediation
It’s time to put on our ‘Mold Detective’ hats and channel our inner Sherlock Holmes.
If mold is the sneaky villain in this story, mold abatement is our epic action plan.
Now, it’s not just about scrubbing away that icky patch in the corner. No, siree!
It’s about delving deep, getting to the root of the issue, and ensuring that our nemesis doesn’t make a grand comeback.
Ready to embark on a 9-step quest to vanquish mold once and for all?
Let’s dive into the methodical world of mold abatement procedures and claim our homes back!
Introduction to the concept of mold abatement
Alright, let’s break this down. If you’ve ever dealt with an uninvited guest (we’re looking at you, mold), you know how tenacious they can be.
But mold abatement? That’s our expertly curated plan of attack. Think of it as the master blueprint for not just giving mold the boot but also ensuring it doesn’t get the cheek to return.
It’s not merely about cleaning; it’s a holistic approach to understanding, managing, and eradicating mold from our living spaces.
Pre-abatement preparations
Before we dive into the actual procedure, let’s chat about some crucial prep work. Imagine trying to paint without priming your canvas it sounds chaotic, right? Similarly:
Safety First: Ensure you have protective gear. Mold isn’t the friendliest of opponents. Gloves, masks, and eye protection are a must.
Isolation: Seal off the mold-infested area with plastic sheeting. This ensures the pesky spores don’t travel and set up shop elsewhere.
Ventilation: Keep windows open, if possible. This lets in fresh air and helps dissipate any mold spores released during cleaning.
Assessment: Evaluate the extent of the mold issue. If it’s covering a large area or you suspect it’s deep within walls or ventilation, consider calling in the professionals.
A detailed 9-step procedure
Hold onto your hats, because here comes the juicy part:
1. Assessment: Understand the type and extent of mold you’re dealing with. Is it a surface problem or is there more lurking behind the scenes?
2. Gear Up: Equip yourself with safety gear – we’re talking masks, gloves, and protective clothing.
3. Containment: Use plastic sheeting and painter’s tape to seal off the affected area. This is your mold quarantine zone!
4. Dry Out: Mold loves moisture. Use fans or dehumidifiers to dry out the area completely.
5. Remove Affected Materials: Sometimes, there’s no saving contaminated items. Dispose of moldy carpet, drywall, or ceiling tiles responsibly.
6. Clean and Disinfect: Use your chosen cleaning solution (hey, remember those natural ones we talked about?) to scrub away mold from hard surfaces.
7. Vacuum: Use a vacuum with a HEPA filter to capture any lingering spores. This isn’t the time for your regular dust-buster.
8. Repair and Replace: Once everything’s clean and dry, replace or repair any materials you removed. A fresh start, literally!
9. Monitor: Keep an eye on the area and maintain a dry environment to ensure mold doesn’t decide on an unwelcome sequel.
And there you have it, the 9-step tango to showing mold the exit. Remember, diligence is key. If ever in doubt, always reach out to experts. Happy abating!
The Role of Professionals in Mold Remediation
Alright, DIY warriors, sometimes even the bravest of us need to call in the cavalry.
While rolling up our sleeves and tackling household challenges can be incredibly satisfying (and wallet-friendly!), there are moments when bringing in the pros is the smartest move on the board.
Mold remediation is a tricky beast, and sometimes it requires a seasoned touch.
So, let’s give a hearty salute to the unsung heroes of mold battles everywhere and dive into why these experts might just be the secret weapon you didn’t know you needed in your mold-fighting arsenal!
When and why to call in the experts
Alrighty, fellow homeowners, let’s get real for a sec. Our homes? They’re our castles, our cozy havens.
And while there’s a LOT we can handle ourselves, mold can be like that tricky level in a video game you just can’t beat. So, when should we hit the call-a-pro button?
Moldy Mansions: If mold’s made itself comfy in a large area (think bigger than a breadbox—or, say, 10 square feet), it’s time for reinforcements.
Behind-the-Scenes Culprit: Notice mold peeking out from behind walls, under floors, or in HVAC systems? That’s an expert’s alley.
Health Hiccups: If your allergies are on overdrive or you’re feeling under the weather (and suspect mold might be the sneaky reason), don’t hesitate to seek expertise.
Stealth Mode: Can’t see it but can smell it? Mold might be playing hide-and-seek. Pros have the gear to spot its hiding places.
Benefits of professional intervention
Alright, think of these pros like the superheroes of the mold world. Capes? Optional. Expertise? Guaranteed.
Equipment Extravaganza: These guys come armed with top-tier equipment that most of us don’t just have lying around. Think infrared cameras, industrial fans, and special vacuums.
Experience = Efficiency: Their wealth of experience means they can spot mold’s favorite haunts faster than you can say spore!
Safety First: They’ve got the know-how to tackle mold without letting it spread to other parts of the house.
Plus, they’ve got the protective gear to ensure the mold doesn’t get personal.
Peace of Mind: With a pro, you’ll sleep soundly knowing the job’s been done right. Priceless!
What to expect from a professional service
Okay, so you’ve decided to dial up the mold maestros. Good call! Here’s a little heads up on the journey you’re embarking on:
Consult & Inspection: Initially, they’ll assess the situation—likely with gadgets that make us feel like we’re in a sci-fi movie.
Game Plan: Post-assessment, they’ll outline a step-by-step remediation plan. It’s like a game strategy, but for mold.
Containment: Before diving in, they’ll seal off the affected zone. We’re talking serious containment measures—think ‘outbreak movie’ level.
Cleanup & Treatment: Armed with their tools and treatments, they’ll get down to the nitty-gritty, ensuring every spore is ousted.
Final Inspection: After the main event, they’ll double-check their work, ensuring no moldy stone remains unturned.
Guidance Galore: Beyond the cleanup, expect some golden advice on keeping your castle mold-free in the future.
Remember, these folks are mold’s worst nightmare, and sometimes, it’s absolutely okay to pass the baton and let them lead the charge!
Mold Prevention: Tips to Keep Your Home Mold-Free
Alright, let’s shift gears a bit. We’ve delved deep into mold battles, but let’s talk about how we can sidestep the skirmish entirely.
Welcome to the proactive world of mold prevention! By nipping things in the bud, we can keep our homes fresh, healthy, and delightfully mold-free.
Ready to explore some top-notch tips? Let’s dive in!
Emphasis on prevention over cure
You know, there’s an old saying that’s been passed down from generation to generation: Prevention is better than cure.
And when it comes to mold, truer words have never been spoken.
Dealing with a mold infestation can be time-consuming, costly, and not to mention, downright stressful!
By focusing on prevention, not only do we save our future selves from potential headaches, but we also ensure our homes remain the safe and cozy sanctuaries they were meant to be.
Keeping mold at bay from the get-go means less damage, fewer health risks, and more peace of mind.
Daily habits for a mold-free home
Creating a mold-free environment is kind of like tending to a garden. It’s the little things we do regularly that make the most significant difference.
So, what are some daily habits we can adopt?
Ventilation Vibes: Make it a point to regularly air out spaces, especially after activities that introduce moisture, like cooking or showering. Crack a window, turn on that exhaust fan, and let your home breathe.
Wipe it Down: Noticed some condensation on your windows or bathroom mirrors? A quick wipe can be your first line of defense against mold growth.
Leak Patrol: Make it a habit to check for leaks. That tiny drip from your faucet today could be a mold party tomorrow.
Dry Laundry Outdoors: If possible, dry your clothes outside. Wet laundry left inside can introduce unnecessary moisture.
Structural considerations and modifications
Our homes are our fortresses, but sometimes, a little tweaking can make them even better at keeping mold out.
If you’re looking to make some more lasting changes to ensure a mold-free abode, here are some considerations:
Roof Check: Ensure your roof is in tip-top shape. A leaky roof is like rolling out the red carpet for mold.
Landscaping Logic: Ensure the ground outside slopes away from your home’s foundation. This way, rainwater doesn’t settle and seep into your home.
Basement Barriers: Consider using water-resistant materials in areas prone to dampness like the basement.
Upgrade Windows: Invest in double-pane windows. They reduce condensation, which, in turn, reduces the risk of mold.
Remember, by investing time and effort into prevention now, we’re setting up our homes for a healthier, happier future. And who doesn’t want that?
Tools and Equipment for Mold Remediation
Alright, fellow mold-fighters, imagine you’re gearing up for an epic quest because, in a way, you are!
Mold remediation isn’t just about elbow grease and good intentions. It’s also about having the right arsenal at your disposal.
Just like any superhero needs their trusty gadgets, we need the best tools and equipment to tackle that pesky mold invasion.
From the simplest scrub brushes to high-tech machinery, let’s dive into the world of mold remediation gear. Ready to gear up?
Introduction to mold remediation tools
Okay, folks, let’s get one thing straight: mold remediation isn’t just a spray and pray operation.
It’s an art, a science, and a strategic battle rolled into one. And as with any craft, the mastery is not just in the hands but also in the tools you hold.
Mold might be crafty, but with the right tools, we’ve got the upper hand.
Dehumidifiers

Ah, the trusty dehumidifier! It’s like a vacuum for moisture in the air.
You see, mold loves to throw a party in damp conditions, but a dehumidifier is like the party-pooper mold never invited.
It helps in maintaining optimal humidity levels, making your space less inviting for mold to grow.
And the best part? Modern dehumidifiers come with humidity monitors, so you always know the moisture levels in your room.
If you live in a naturally humid area or your home tends to retain moisture, this gadget is a game-changer.
Protective clothing
Alright, fashion-forward friends, this might not be the runway look you were hoping for, but when it comes to mold remediation, safety is the real style statement.
From goggles to ensure spores don’t get in your eyes, to gloves that protect those hands, and respirators to ensure you’re not inhaling any harmful spores, dressing the part is essential.
Think of it as your mold-fighting armor. And always remember: it’s not just about looking the part; it’s about ensuring you’re protected from head to toe.
Others
There’s a whole universe of tools out there waiting to be explored. Some of our other MVPs (Most Valuable Products) include:
Air Scrubbers:

Air scrubbers help clean the air of mold spores, ensuring that post-remediation, you’re not still breathing in any leftovers.
HEPA Vacuums:

Regular vacuums might just spread mold spores around, but HEPA vacuums are designed to trap them effectively.
Sprayers and Foggers: For applying mold control and removal products. It’s like giving mold a one-way ticket out of your home.
Guidelines on using them effectively
Tools are only as good as the hands wielding them, so here are some golden rules to keep in mind:
Always Read the Manual: Whether it’s a dehumidifier or an air scrubber, ensure you’re familiar with the manufacturer’s guidelines.
Regular Maintenance: Like any equipment, your mold remediation tools need regular TLC to function optimally. Clean and maintain them as recommended.
Safety First: Especially with protective gear, ensure everything fits well and is worn correctly. And, remember to discard or clean items that come directly in contact with mold.
Stay Updated: Mold remediation technology is ever-evolving. Keep an ear to the ground for new tools or improvements in the market.
Armed with the right tools and knowledge, we’re not just mold-fighting enthusiasts; we’re mold-fighting champions! Onwards to a cleaner, mold-free future!
Mold Remediation in Special Spaces: Basements, Attics, and Bathrooms
Ever walked into your basement, attic, or bathroom and thought, ‘Hmm, something smells moldy?’
These spaces, with their nooks, crannies, and varying humidity levels, are like five-star hotels for mold.
We’re about to demote them to a no-star rating! Let’s embark on a journey to understand the unique challenges and solutions of mold remediation in these special spaces.
Buckle up, it’s time to dive deep into basements, soar high into attics, and splash around in bathrooms—all in the name of banishing mold!
Overview of challenges in these spaces
Oh no, basements, attics, and bathrooms. Why do you have to be such a magnet for mold?
Well, the answer lies in their very nature. These spaces often see less ventilation, more humidity, and varied temperatures.
It’s like they rolled out the red carpet for mold to settle in. Basements can be damp from groundwater or leaks, attics might have poor insulation, and let’s not even get started on the steamy showers in bathrooms.
With these conditions, it’s no wonder mold thinks it’s found its forever home. But we’re here to serve an eviction notice!
Special considerations for each space
Basements: These underground sanctuaries are often cooler and have the potential to trap moisture, especially if they’re not well-ventilated.
Groundwater, poor drainage, or even that tiny leak you’ve been ignoring can be an invitation for mold.
Remember, it’s not just the walls—check storage boxes, fabrics, and wooden items.
Attics: It’s not just old Christmas decorations and forgotten memories up there.
Attics can become mold breeding grounds, especially if they’re not properly insulated.
Roof leaks, poor ventilation, or condensation from the rest of the house can be culprits.
And if you’re storing stuff up there, make sure it’s dry and well-aerated.
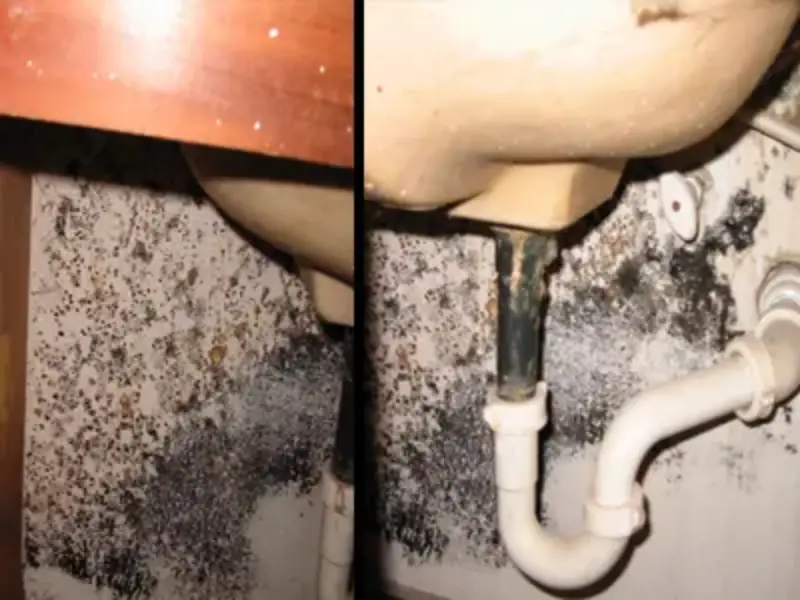
Bathrooms: Ah, the steamy haven! Regular showers, occasional leaks, and sometimes a lack of windows make bathrooms a hot spot for mold.
Those grout lines, under the sink cabinets, and shower curtains are places mold just loves to lurk.
Techniques tailored for these areas
Basements: Dehumidifiers are your best friends here. Also, consider sealing any foundation cracks and installing a proper drainage system.
And hey, while you’re at it, why not add some moisture-resistant paint? Let’s make that basement less appealing for mold.
Attics: First things first, check your roof for leaks. Next, consider installing ridge and soffit vents to improve ventilation.
Insulation is key—not just for your energy bills, but also to prevent mold.
And for those cherished stored memories? Maybe it’s time to go through them, ensuring they’re dry and packed in airtight, moisture-resistant containers.
Bathrooms: Start with a good exhaust fan, and make it a habit to turn it on during and after showers.
Regularly check for leaks and fix them promptly. For an added layer of protection, opt for mold-resistant paint and regularly clean and dry shower curtains, tiles, and grout lines.
Armed with these tailored techniques, mold won’t stand a chance, no matter where it tries to set up shop in your home. Victory is ours!
Conclusion and Resources
Whew! We’ve journeyed through the twists and turns of mold remediation, from attics to basements and all the sneaky spaces in between.
As we wrap up, let’s take a moment to appreciate the knowledge we’ve gathered and the steps we’re equipped to take.
But remember, the learning doesn’t stop here.
Dive into the resources section to get even more insights and tools.
Here’s to a mold-free future and the peace of mind that comes with it!
Recap of the importance of mold remediation
It’s been quite the whirlwind, hasn’t it? Let’s step back for a moment and remember why we dived into this in the first place.
Mold is no laughing matter; it’s a sneaky invader that can affect our health, the very air we breathe, and the structural integrity of our homes.
Tackling mold is about more than aesthetics. It’s about creating safe spaces for ourselves and our loved ones. After all, who wouldn’t want to breathe easy in their own home?
Encouraging proactive measures
If there’s one golden nugget to take away from all this, it’s this: prevention is key.
By being proactive, you can save yourself a lot of time, money, and stress in the long run.
So, whether it’s regular checks in your home, using a dehumidifier, or just being more mindful about leaks and damp spots, every little bit counts.
And hey, in the battle against mold, you’ve got this guide as your trusty sword.
Go forth, be vigilant, and let’s keep mold out of our homes!
Additional resources, links, and references
Hungry for more? We thought so! To equip you even further in this mold-fighting journey, here are some resources and links that are absolute gold:
A Brief Guide to Mold, Moisture and Your Home | US EPA
https://www.cdc.gov/mold/faqs.htm
Dive in, do your research, and always stay informed. Knowledge, after all, is power. And with this power, you’re not just equipped to tackle mold but to create a healthier, happier living space. Cheers to that!
